BioStitch-500 converts your current microscope to semi-automated imaging system
This is the most economical solution to upgrade your existing microscope to a digital slide scanner. You can scan a slide, well-plate or any large specimen with a manual mechanical XY stage, and stitch all images at any magnification you like. BioStitch is a package of Camera and Software which works with any upright, inverted or stereo microscope and it is super simple to use
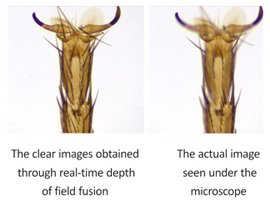
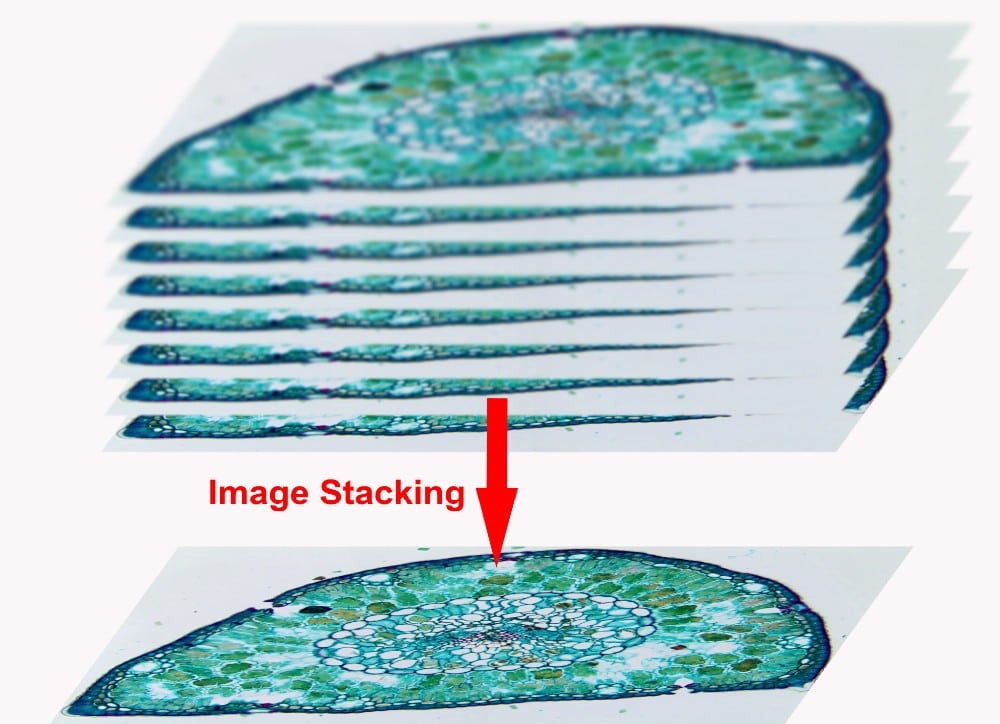
 The software also supports live extended depth of field (EDF) feature.
Good reasons to consider this:
– your samples are seen at the big view when you use low magnifications such as 4x, 5x or 10x.
– your samples need to be scanned at 20x or 40x magnification, but the field of view+ is too small.
– you need to scan full size or big ROI (region of interest) of a slides or well-plate occasionally
Good reasons to NOT consider this option:
– you need to scan a significant quantity of slides everyday
– the barcode labels of your slides needs to be read automatically
– the samples on your slides are too large (like 20x20mm²) while you need to use higher magnification such as 40x
– most of your samples consist of multiple parts that are not connected to each other
- Manual Whole Slide Imaging.
- Save money.
- Scan manually!
- High resolution scans.
- Share virtual slides fast.
- Most affordable scanner.
- Types: Pathology Slide Scanner, Whole Slide Imaging, Digital Pathology, Oil Slide Scanning.
Detailed Features:
By using your own microscope equipment, you only need to have this camera and the BioStitch slide imaging software will do the job. That’s just a small fraction of a slide scanner or motorized scanner cost!
For specimens up to 10 x 10 millimeters it’s often actually faster to scan manually! Additionally, if you are waiting for slide scanners to become affordable, just start with the manual process now.
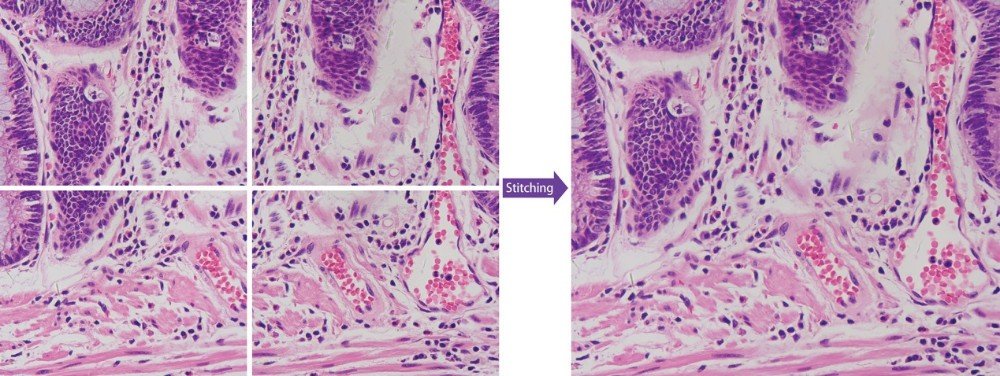
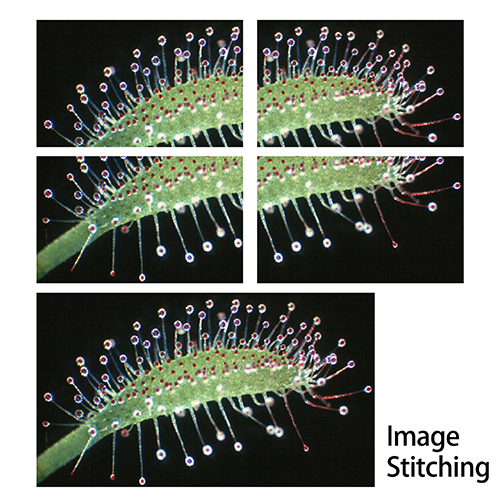
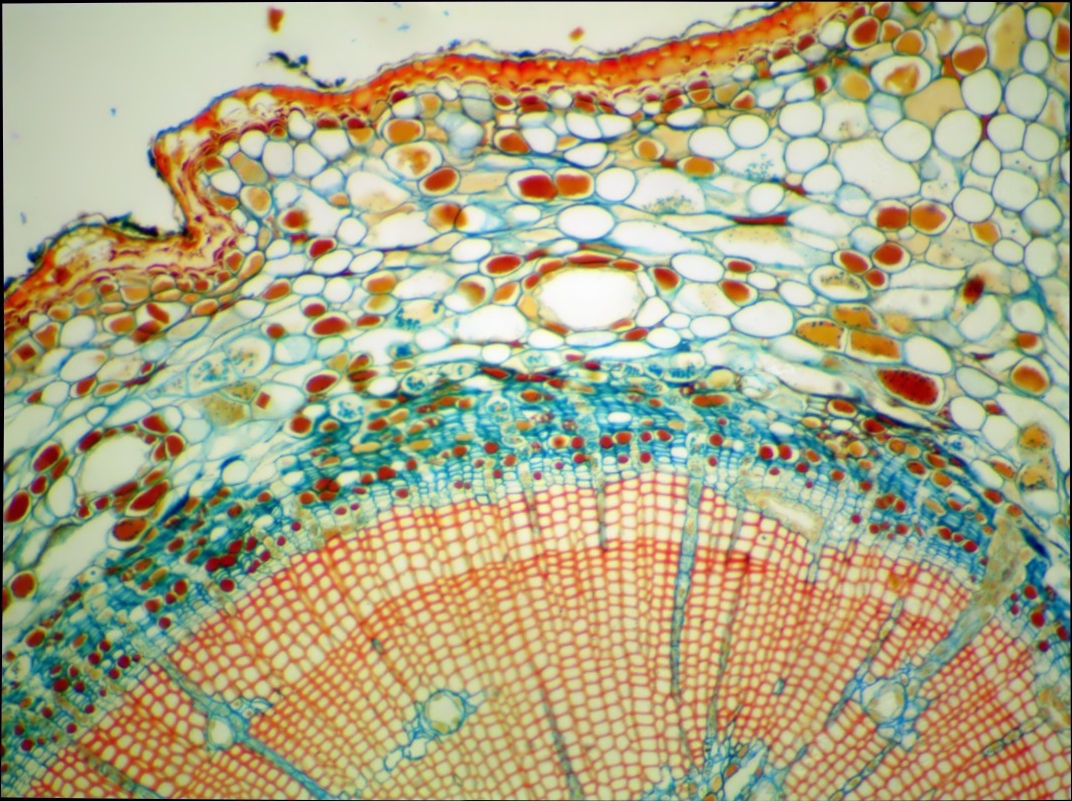
Use a high-magnification objective lens and stitch the images in few minutes. You can make images at TeraPixels if you wish.
Scanning a slide with oil immersion objectives is possible, too.
Bridge a potential outage of your slide scanner conveniently using manual whole slide imaging.
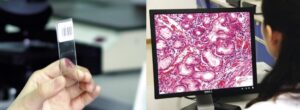
- Collaboration: Share difficult or interesting slides with your colleagues for a second or third opinion. They just need a browser to look at your slides.
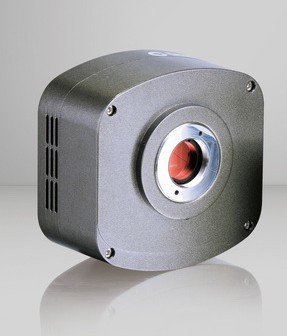
BioStitch-500 Live Stitching/Mosaicing & Digital Slide Scanning Software with Free Camera
Summary
This is the most economical solution to convert your microscope to a digital slide scanner. You can scan a slide manually with a manual XY stage, and stitch all images at any magnification you like to use. You can use this with an upright, inverted or stereo microscope and simply by combing this camera with a C-mount adapter and the software we offer.
The software also supports live extended depth of field (EDF) feature.
What do you need?
By using your own microscope equipment, you only need to buy this software-camera package then to be able to do whole slide imaging within a minute. This’s just a fraction of a slide scanners cost!
 To have a digital slide scanner, with minimal cost and lots of options, you need these items:
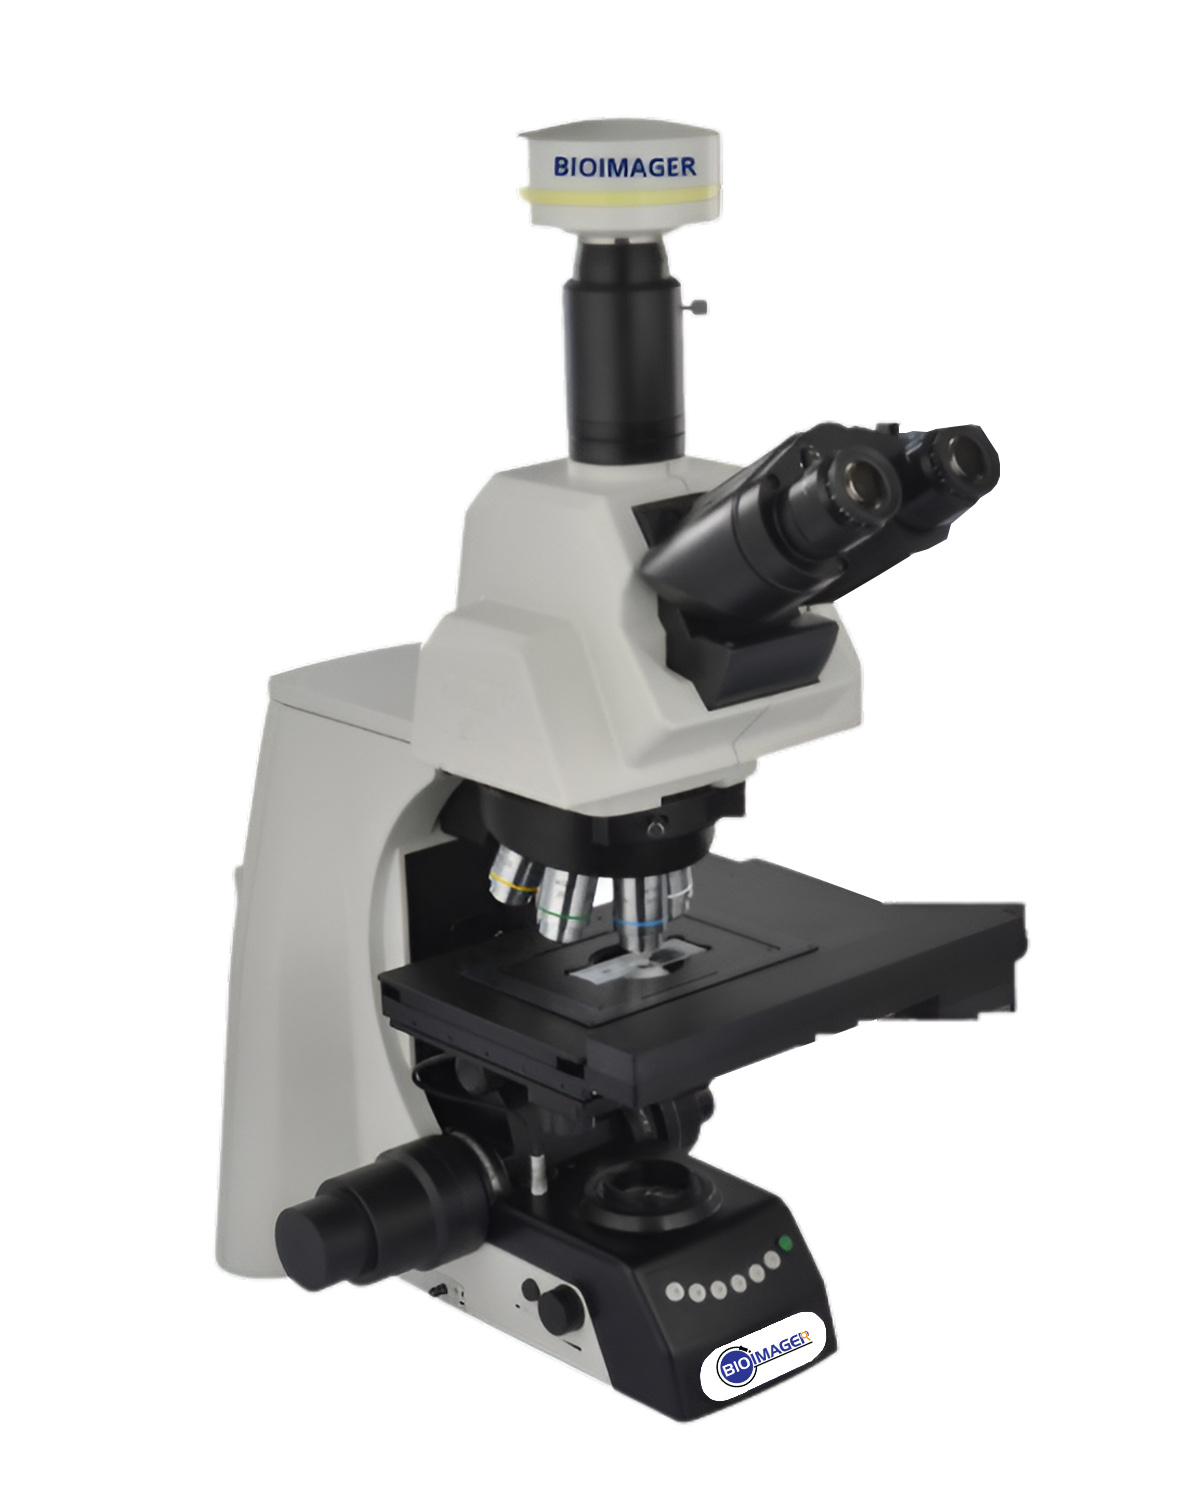
1- A microscope
You can use an inverted, upright or stereoscope, depending on the application. Upright biological microscopes are very common for slide scanning, due to the easy handling of slides and also the availability of automated slide loader. Inverted microscopes will be an advantage if you cannot flip over your sample if you have a sample without coverslip. Stereoscopes are commonly used for a large sample of minerals and polarized samples.
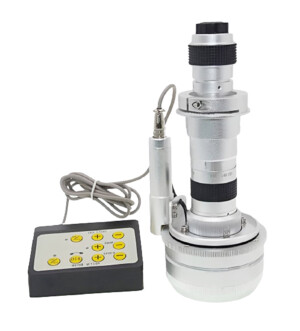
2- Manual XY stage
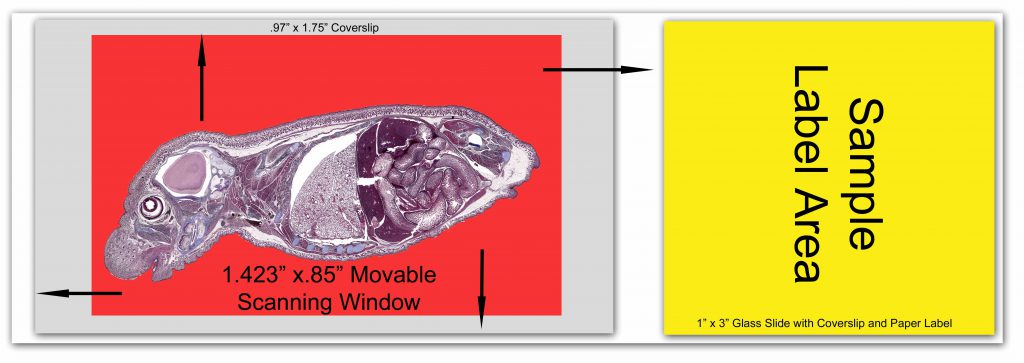
You need a good mechanical XY stage to move your sample in X and Y directions / horizontal and vertical directions to scan the big region of your sample. If you need this or a glass slide holder, just contact us or select from the optional items.
Note: You can use a high-precision XY stage for magnifications over 40x.
3- A C-Mount adapter
To connect the camera with your microscope. Using the proper size of the c-mount adapter is matter. For a 1/2″ sensor, you will need a 0.5x C-mount adapter. It would be better you use a 0.66x or even 1x c-mount adapter to have the maximum flatness of your image. If you do not have a plan apo obj lens or you do not like to spend money on these expensive lenses, using a higher magnification of c-mount adapter is a very good solution.
4- A Camera and Software
We offer several models of cameras.
| Model |
BioSticth-300 |
BioStitch-500 |
BioStitch-900 |
BioStitch-2000 |
| Sensor |
1/1.8″ |
2/3” |
1″(14.13×7.45) |
1″(13.06mm x 8.76mm) |
| Pixel Size |
3.45×3.45um |
3.45 x 3.45um |
3.45×3.45 |
2.40μm x 2.40μm |
| Resolution |
2048 x 1536
(3.1MP) |
2448 x 2048
(5MP) |
4096×2160
(9MP) |
5472×3648
(20MP) |
| Frame Rate
(at binning) |
53fps (1×1)
85fps (2×2) |
35 fps (1×1)
88 fps (2×2) |
34fps (1×1)
60fps (2×2) |
14fps (1×1),
53fps (2×2)
67fps (3×3) |
Example
For example, this scan (link below) is 72,079 x 35,892 pixels, i.e. 2,587 MegaPixels or 2.6 GigaPixels with ~500 Megabites file size (compressed). Of course, this takes some time to scan an area like that manually but it is possible.https://www.easyzoom.com/image/92839/popular
Example Video using BioStitch-300 for Live Stitching
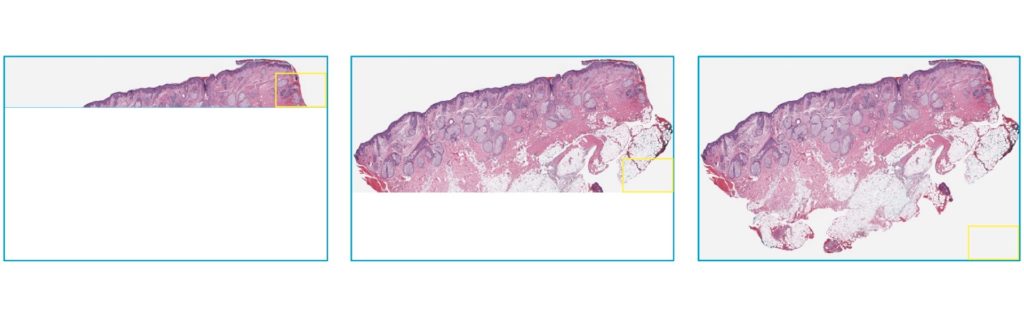
Some Hints:1. Using lowest exposure time such as 50ms or so is always suggested.2. Using a higher magnification of c-mount adapter helps to generate a flat and uniform image.3. Start with low magnification for initial practice and figuring out the large map of the sample then use higher magnification for some ROIs.4. As you know well, when you switch from 10x to 20x obj lens or 20x to 40x, you magnify the image and increase resolution double, BUT you get the field of view (FOV) four times smaller (twice in X- and twice in Y-direction.). This means you need to spend 4x longer time to cover the same FOV at higher magnification.5. If you have a tilted sample, when you move the sample with XY stage, use your other finger to adjust the focus gently.Extended Depth of Field (EDF):

| Model |
BioSticth-300 |
BioStitch-500 |
BioStitch-900 |
BioStitch-2000 |
| Sensor |
1/1.8″ |
2/3” |
1″(14.13×7.45) |
1″(13.06mm x 8.76mm) |
| Pixel Size |
3.45×3.45um |
3.45 x 3.45um |
3.45×3.45 |
2.40μm x 2.40μm |
| Resolution |
2048 x 1536
(3.1MP) |
2448 x 2048
(5MP) |
4096×2160
(9MP) |
5472×3648
(20MP) |
| Frame Rate
(at binning) |
53fps (1×1)
85fps (2×2) |
35 fps (1×1)
88 fps (2×2) |
34fps (1×1)
60fps (2×2) |
14fps (1×1),
53fps (2×2)
67fps (3×3) |
| Sensor Type |
CMOS
Color |
| Exposure Time |
0.13ms -15 s
Manual and auto exposure |
| Color Temperature |
2000-15000K |
| Image Format |
JPEG, PNG, TIFF |
| Interface |
Database: USB 3.0
Mechanical: Standard C-Mount |
| Software setting |
Auto: color scale, white balance
Manual: gain, noise reduction, gamma, saturation, flat field corrections
Background selection color
Choose between speed and quality while scanning |
| Support |
4 Multiple cameras, simultaneously in SDK |
| Dimension |
Size: 68x68x46mm
Weight: 330g |
Recommended PC Configuration:
CPU: Intel Core i5 or better (Quad or more core)
RAM: 8GB or more
OS: Windows 7/8/10 32 or 64bit
Only logged in customers who have purchased this product may leave a review.


Reviews
There are no reviews yet.